Great Forums

Tut Sites I Follow

Tuesday, 27 September 2011
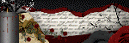
 MAGICAL AUTUMN
MY FIRST TUT IN A VERY LONG TIME SO IF NOT UP TO PAR PLEASE EXCUSE LOL

This tag is animated click on the tag to see the animation :)
This tutorial was written by me on the 26/9/2011 any resemblence to any other tutorial is purely coincidental.
SUPPLIES NEEDED
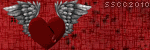
Tube of choice : I am using the awesome work of Zidny Nielsen you must have a license to use her work.
You can buy Zindys tubes HERE.
Animation dripping by the awesome Missy which you can download from HERE Animations 5. Thanks
Texture of choice : I used one of Vix textures which you can get HERE. Thanks
Background/mist of choice : I cannot supply the one i used as im not sure whose it is or where it came from if anyone knows please let me know to give proper credit.
Pluggins Used : Penta, colour Dot, and animation shop
Open a new transparent image 600 x 250
Pick 2 colours from your tube one for the foreground and one for the background and use these 2 colours to make a gradient.
Flood fill canavas
copy and paste a texture of choice and in the layer pallett change the blend mode to screen
copy and paste you choosen background / mist place in position and change the blend mode to darken.
copy and paste your tube into place
Using your shape tool rectangle selected make a rectangle down the left handside or your tag see mine for placement.Convert to raster layer and change the blend mode to soft light.
Using a bold font of chocie type out a word of choice (i used the word magical ) I used impact, conert to raster layer, image rotate, free rotate then left 90. place your word over the rectangle you just made.
Adjust - add/remove noise Uniform 51 monochrome checked.
Now using a script font of choice type out another word in white i wrote Autumn, imate rotate free rotate left 90 and place over your larger word.
In your layer pallet make active your bottom layer. Selections, select all, selections modify, select selection borders tick Inside, border width 4 and anti alias ticked
add a new layer and flood fill with colour of choice, selections select none. Drag this layer to the very top.
Add pent colour dot to this layer default setting or use a different effect of chocie.
Add any other accents of choice.
Add all © info and were ready to animate.
in the layer pallette x out the border layer and tube layer
Go to Edit, copy merge
open up animation shop and paste as a new image
Duplicate until u have 12 frames
Open up Missys animation
click first frame, go to edit, select all edit , copy.
Now click the first frame of your tag , edit, select all, edit paste into selected frames and place the animations where best suits your tag.
You can always use the drag and drop method if you find it easier.
Back to psp x out all layers, unx the tube, border and © layer again copy merge
back to animation and paste as a new image again duplicate till you get you 12 frames
click first frame, go to edit, select all edit , copy.
Now click the first frame of your tag , edit, select all, edit paste into selected frames
when in place view animation and when happy with it save as a gif.
Thanks for trying out my tutorial.
Lorna x
Subscribe to:
Post Comments (Atom)
My Blinkie

Favorite Blogs


0 comments:
Post a Comment